Introduction
Creating FBA shipments in Seller Central means navigating multiple pages for every single shipment — entering your warehouse address, adding products one by one, filling box dimensions, choosing carriers, and downloading labels. It's repetitive, error-prone, and slow.
SellerSheet handles the entire Send-to-Amazon (STA) workflow from Google Sheets. Set up your warehouse address once, fill in your products and box configurations, then click through the sidebar buttons to initiate, confirm, and track your shipment — including FBA carton labels and FNSKU barcode labels.
This guide covers the Box First, Split Later workflow using 4 sheets: Shipment Setting, Product Info, Manage Shipments, and the STA working sheet.
Set Up Sheets
Address, products, tracking
Fill STA Sheet
Boxes, MSKUs, quantities
Create & Confirm
Initiate, options, confirm
Get Labels
FBA + FNSKU labels
Prerequisites
- Store Authorization: Authorize your Amazon store on the SellerSheet Dashboard.
- Sidebar Installed: Install the SellerSheet sidebar add-on. See the Onboarding Guide.
- FBA Access: Your Amazon Seller Central account must have FBA (Fulfillment by Amazon) access enabled.
Setting Up Your Sheets
The Problem
In Seller Central, you re-enter your warehouse address, product details, and box dimensions every time you create a shipment. There's no way to save templates or reuse configurations across plans.
SellerSheet uses a FBA spreadsheet with dedicated tabs so you configure your data once and reuse it for every shipment. The FBA spreadsheet contains 4 key tabs:
1. Shipment Setting
Fill in your warehouse or ship-from address. Each row represents a different warehouse/location identified by a unique Warehouse Code. You only need to fill this once per warehouse.
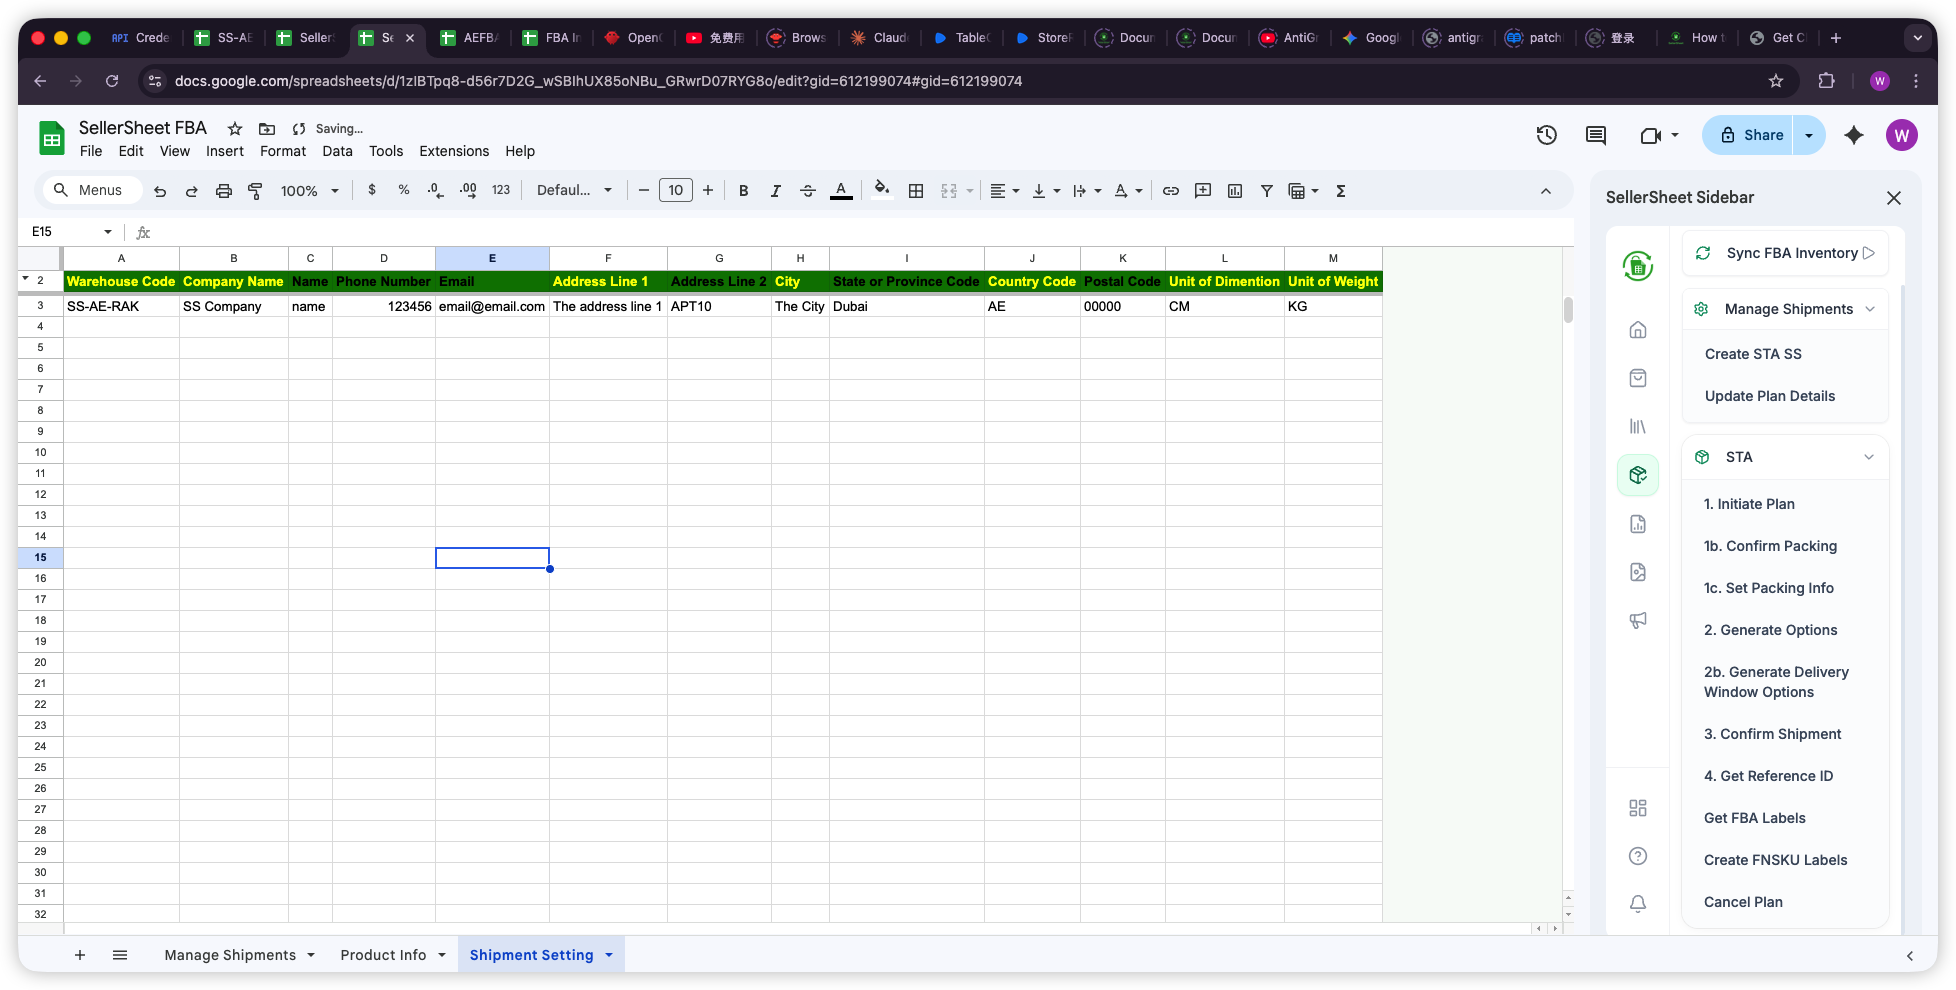
Shipment Setting Columns
- warehouseCode: Unique ID for this warehouse (e.g.,
SS-AE-RAK). - companyName: Company name on the shipping label.
- name / phoneNumber / email: Contact information for the ship-from address.
- addressLine1 / addressLine2: Street address.
- city / stateOrProvinceCode / countryCode / postalCode: Location details.
- unitOfDimention: Measurement unit for box dimensions (
CMorIN). - unitOfWeight: Weight unit (
KGorLB).
2. Product Info
Fill in your product catalog with SKU, FNSKU, ASIN, box dimensions, and prep details. When you create an STA sheet, product data is automatically pulled in via VLOOKUP — so you only fill this once per product.
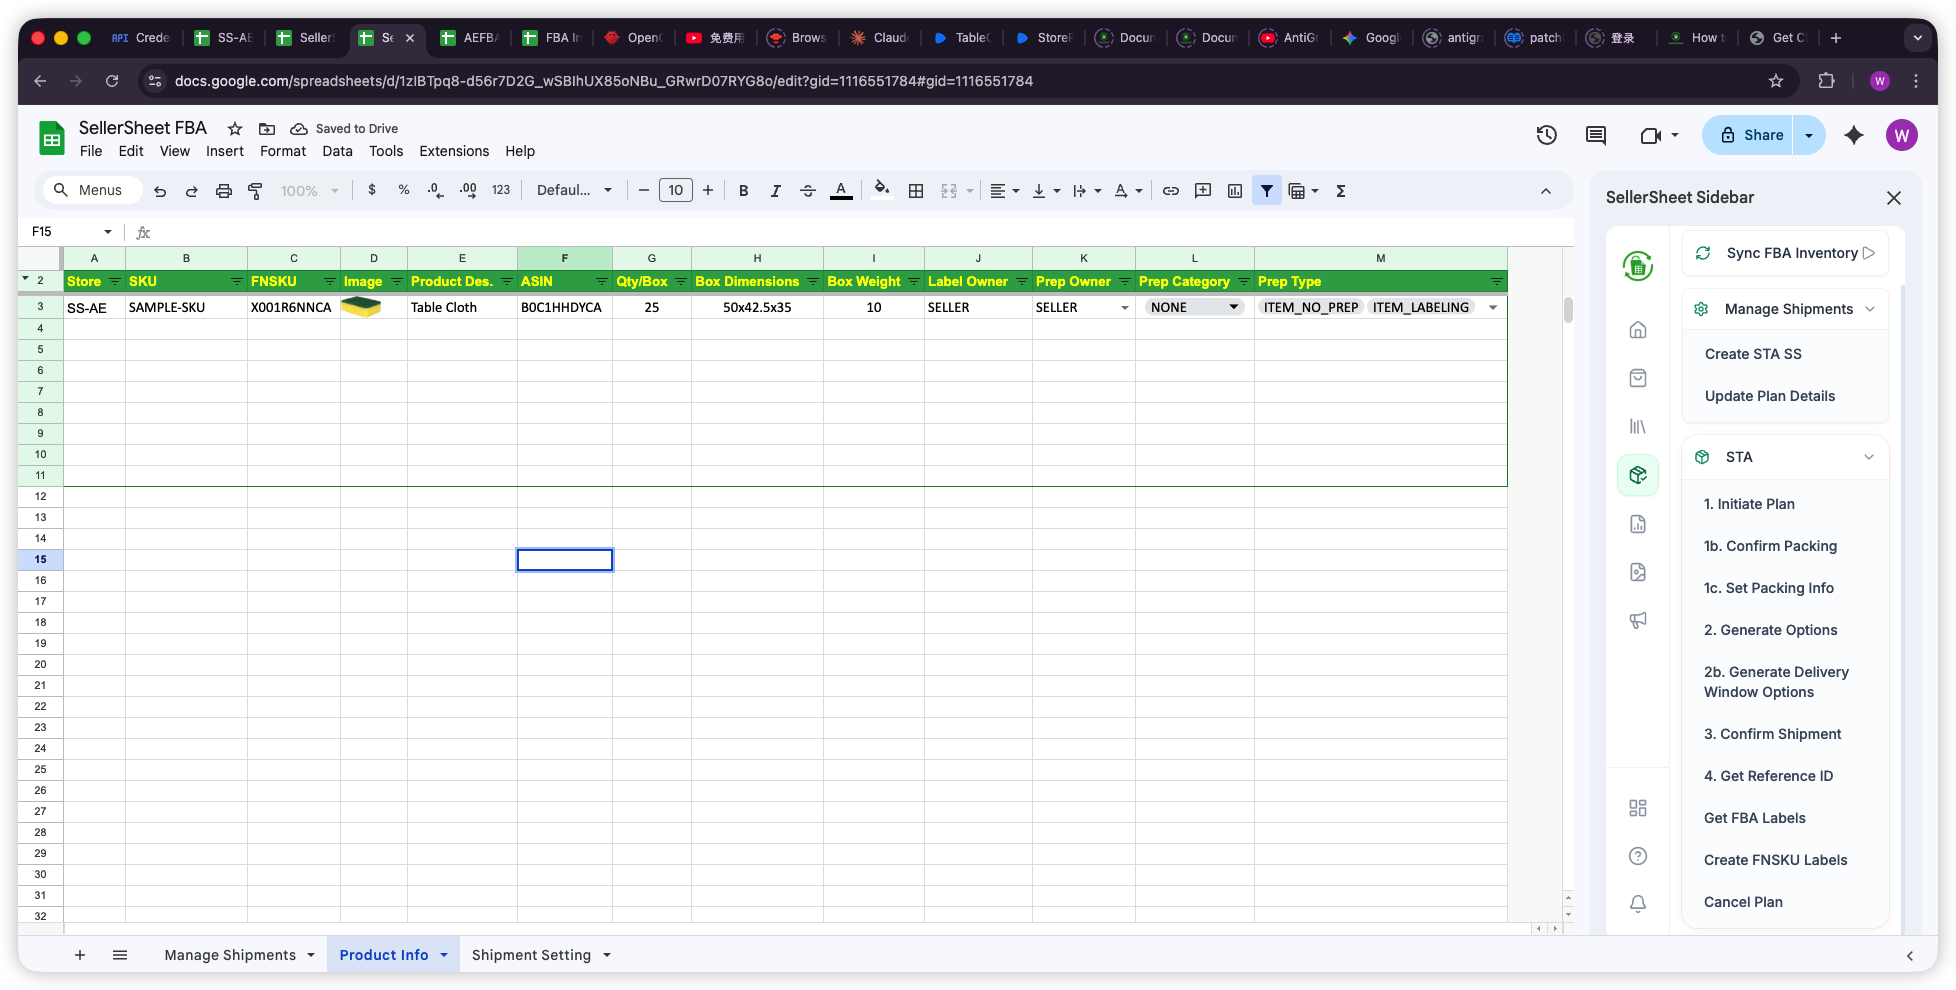
Product Info Columns
- store: Store identifier (e.g.,
SS-AE). - msku: Your Merchant SKU.
- fnsku: Amazon's Fulfillment Network SKU.
- asin: Amazon Standard Identification Number.
- qtyPerBox: Number of units per box.
- boxDimensions: Length x Width x Height (e.g.,
50x42.5x35) in units from Shipment Setting. - boxWeight: Weight per box in units from Shipment Setting.
- labelOwner: Who labels items (
SELLERorAMAZON). - prepOwner: Who preps items (
SELLERorAMAZON). - prepCategory / prepTypes: Prep requirements (e.g.,
NONE,ITEM_NO_PREP, ITEM_LABELING— comma-separated for multiple).
Pro Tip: Auto-Import from FBA Inventory Reports
Use Store Reports to create an FBA Inventory Report — it gives you SKU, FNSKU, ASIN, and product title automatically. See the Store Reports guide for details.
3. Manage Shipments
This is your central tracking hub for all FBA shipments. Each row represents one shipment plan. You fill in the basic details here, then click Create STA SS to generate the working spreadsheet.
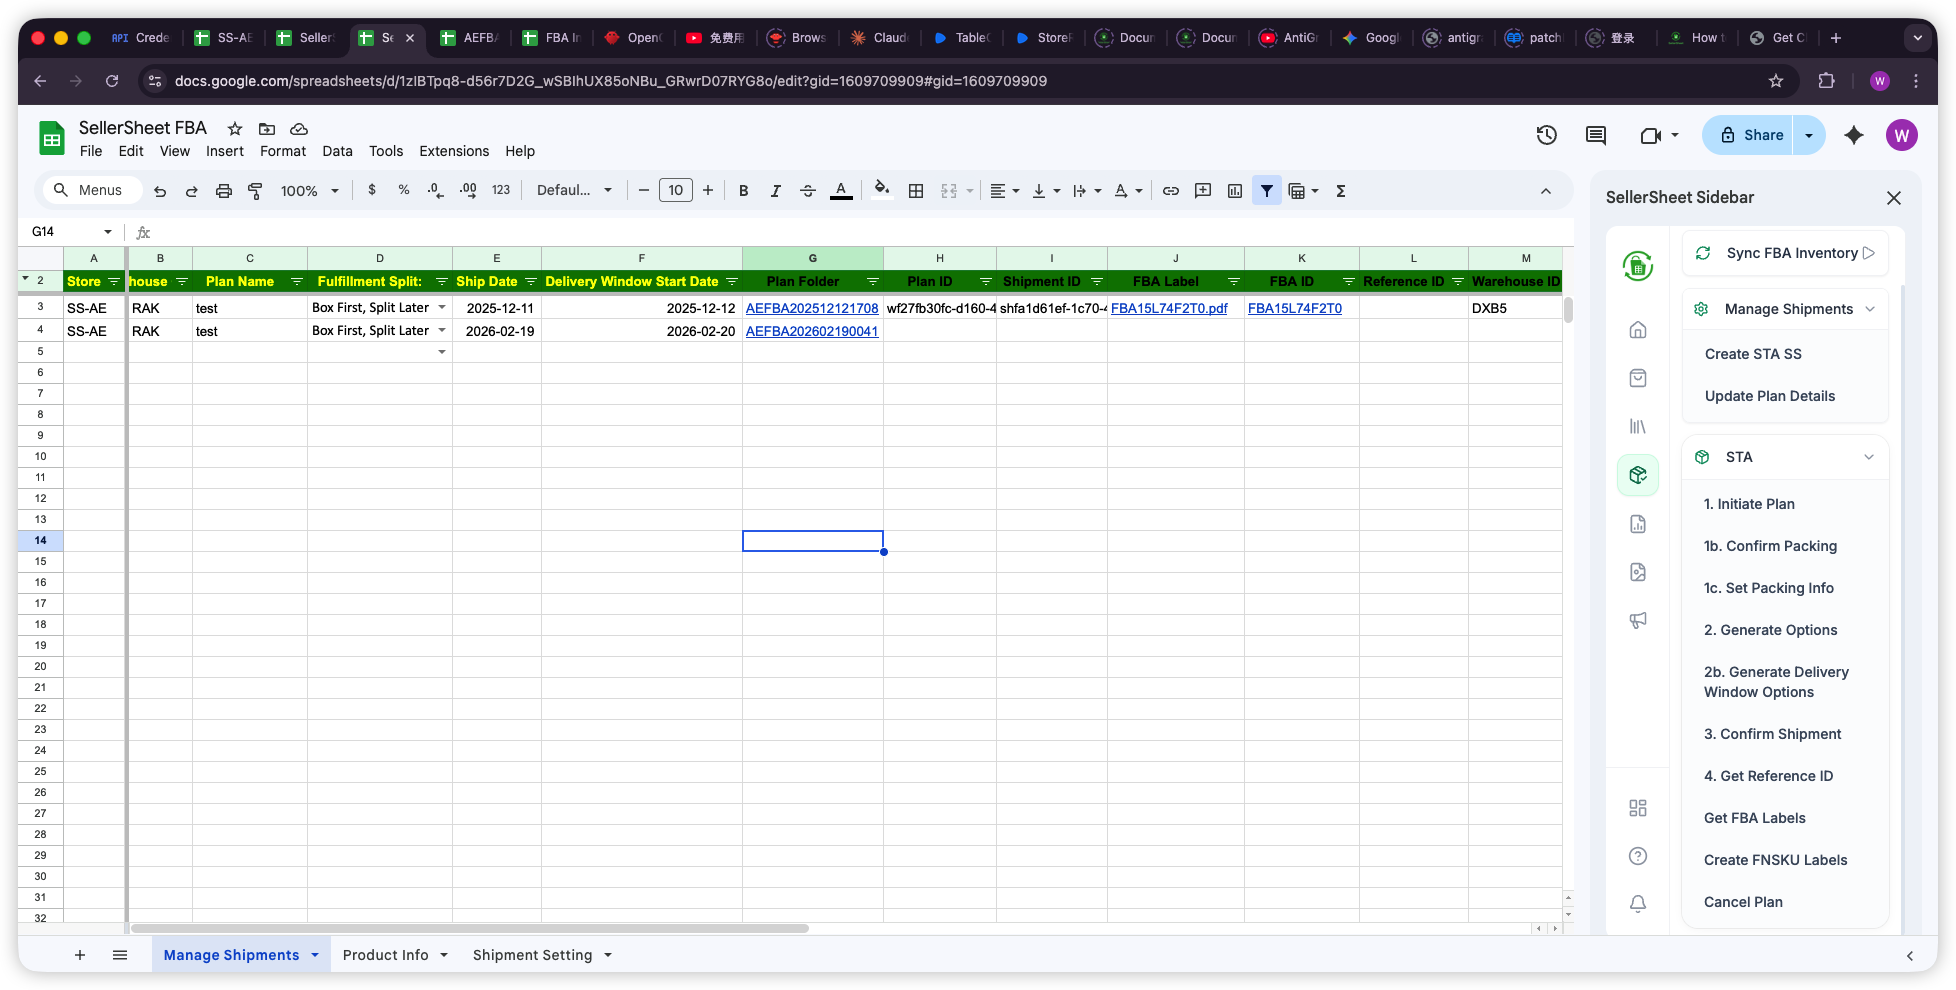
Manage Shipments Key Columns
- store / warehouseCode: Which store and warehouse to ship from.
- planName: Your label for this shipment plan.
- fulfillmentSplit: Packing strategy (
Box First, Split Later). - shipDate / deliveryWindowStartDate: Shipping schedule.
- planFolder: Hyperlink to the STA spreadsheet (auto-generated).
- planId / shipmentId: Amazon's plan and shipment identifiers (auto-filled).
- fbaLabel / fbaId: FBA label PDF link and confirmation ID (auto-filled).
- amazonReferenceId: Amazon's reference number confirming readiness (auto-filled).
- status: Current shipment status (
WORKING,SHIPPED,CLOSED). - carrier / tracking: Your carrier and tracking number.
- remark: Internal notes.
Creating Your STA Shipment
The Problem
In Seller Central, creating an FBA shipment plan means clicking through 5+ pages of forms — entering ship-from address, adding products one by one, filling box dimensions, selecting carriers. For each shipment. Every time.
SellerSheet's sidebar walks you through numbered steps. Each button calls the Amazon API and fills results back into your sheet automatically. The entire flow takes a few clicks instead of dozens of form pages.
1. Create STA Spreadsheet
On the Manage Shipments sheet, fill in a row with your shipment details:
- Set Store and Warehouse Code (must match Shipment Setting).
- Enter a Plan Name (your internal label).
- Set Fulfillment Split to
Box First, Split Later. - Fill in Ship Date and Delivery Window Start Date.
- Click Create STA SS in the sidebar.
SellerSheet creates a new spreadsheet in organized Google Drive folders (Store > Country > Year > Month) and opens it automatically. The STA sheet is pre-populated with your warehouse address from Shipment Setting and product data from Product Info via VLOOKUP.
2. Fill the STA Sheet
The STA sheet has two main areas: the header section (auto-filled from your Manage Shipments row) and the item grid (where you fill in your products and box assignments).
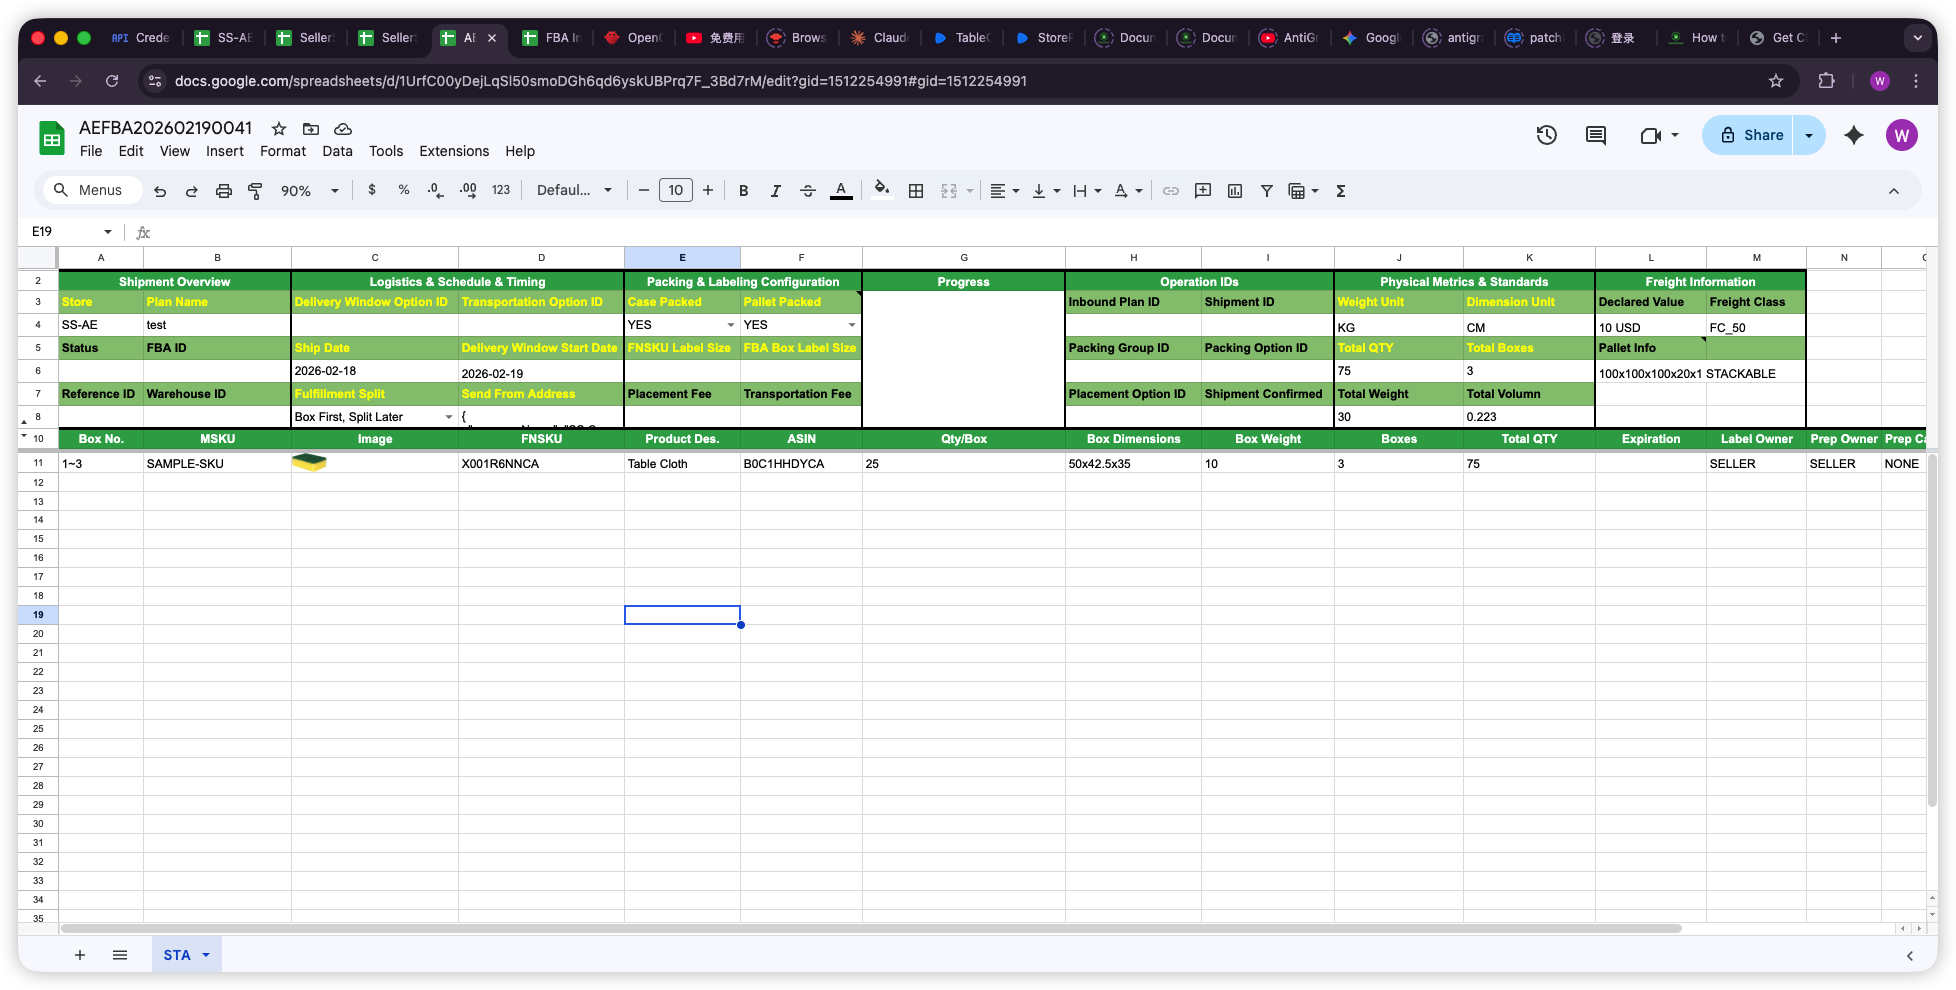
STA Sheet Layout
- Rows 1–3 (Shipment Overview): Store, Plan Name, Delivery Window Option ID, Transportation Option ID, Case Packed, Pallet Packed.
- Rows 4–6 (Status & IDs): Status, FBA ID, Ship Date, Delivery Window Start Date, FNSKU Label Size, FBA Box Label Size, Packing Group ID, Packing Option ID, Total QTY, Total Boxes, Pallet Info.
- Rows 7–9 (Confirmation): Reference ID, Warehouse ID, Fulfillment Split, Send From Address (JSON), Placement Fee, Transportation Fee, Placement Option ID, Shipment Confirmed, Total Weight, Total Volume.
- Row 10+ (Item Grid): boxNo, msku, image, fnsku, title, asin, qtyPerBox, boxDimensions, boxWeight, boxes, quantity, expiration, labelOwner, prepOwner, prepCategory, prepTypes.
In the item grid, fill in:
- boxNo — Which boxes contain this product (e.g.,
1~3means boxes 1 through 3). - msku — Your Merchant SKU. VLOOKUP auto-fills fnsku, title, asin, qtyPerBox, boxDimensions, boxWeight, labelOwner, prepOwner, prepCategory, and prepTypes from Product Info.
- boxes — How many boxes for this product line (auto-calculated from boxNo range).
Important: Box Number Format
Use 1~3 to indicate boxes 1 through 3 share the same contents. Each range or number on a separate row represents a distinct product-to-box assignment.
3. Initiate Plan
Click 1. Initiate Plan in the sidebar. SellerSheet calls the Amazon API to:
- Create an inbound plan with your products and box configuration.
- Generate packing options.
- Auto-confirm if only one packing option exists.
The Progress field updates to show: 1a. Initial Inbound Plan Created and 1b. Packing Option Confirmed.
Multiple Packing Options?
If Amazon returns multiple packing options, an STA-Options sheet is created. Review the options, select one, then click 1b. Confirm Packing. After packing is confirmed, click 1c. Set Packing Info to send your box dimensions and weights to Amazon.
4. Generate Options
Click 2. Generate Options in the sidebar. Amazon returns three types of options:
- Placement Options — Which fulfillment centers to ship to, with associated placement fees.
- Transportation Options — Shipping methods (Amazon Partnered Carrier vs. Use Your Own Carrier).
- Delivery Windows — Available delivery time slots (for non-partnered carriers).
For a single shipment: Dropdown validations appear on the Placement Option ID and Transportation Option ID cells in the STA sheet. Select your preferred options from the dropdowns.
For multiple shipments (when Amazon splits items to different warehouses): The STA-Options sheet populates with one row per shipment, each with its own placement, transportation, and delivery window dropdowns. See Handling Multiple Shipments below for details.
Transportation Options
- AMAZON_PARTNERED_CARRIER: Amazon handles pickup and delivery. No delivery window selection needed — Amazon manages the scheduling.
- USE_YOUR_OWN_CARRIER: You arrange your own shipping. Click 2b. Generate Delivery Window Options to get available delivery slots, then select one.
5. Confirm Shipment
Once you've selected your options, click 3. Confirm Shipment. SellerSheet performs the full confirmation sequence:
- Confirms your selected placement option.
- Confirms the transportation option (carrier selection).
- Confirms the delivery window (if using your own carrier).
- Downloads the FBA carton labels PDF to your Google Drive.
After confirmation:
- FBA ID cell shows the shipment confirmation ID (hyperlinked to the label PDF).
- Status updates to
WORKING. - The Manage Shipments sheet is auto-updated with the confirmed shipment row.
Pro Tip: Multiple Shipments Confirmed in One Click
When Amazon splits your plan into multiple shipments, Confirm Shipment processes all shipments for the selected placement option at once. Each gets its own FBA label PDF and row in Manage Shipments.
6. Get Reference ID
Click 4. Get Reference ID to check if Amazon has assigned a Reference ID to your shipment. If ready, the Reference ID is populated and the status may update. If not ready yet, wait 5–10 minutes and try again.
Pro Tip: Reference ID Timing
The Reference ID confirms Amazon is ready to receive your shipment. It typically takes 5–10 minutes to generate after confirmation. Don't worry if it shows "Not Ready" immediately.
Getting Labels
The Problem
Downloading FBA carton labels from Seller Central means finding the right shipment, navigating to the labels page, and downloading one PDF at a time. For FNSKU labels, you need a separate barcode generator tool.
FBA Carton Labels
Click Get FBA Labels in the sidebar. SellerSheet downloads the FBA carton label PDF to your Google Drive in the plan folder. The FBA ID cell becomes a clickable hyperlink to the PDF.
This also works from the Manage Shipments sheet — select the row and click Get FBA Labels to download labels for any shipment.
FNSKU Item Labels
To generate FNSKU barcode labels for individual items:
- Set FNSKU Label Size in the STA sheet header (e.g.,
30x50 mm,4x6 inch). - Click Create FNSKU Labels in the sidebar.
SellerSheet generates barcode labels for every unit across all boxes. Labels are grouped by FNSKU with a summary page showing the box breakdown and total label count — ready for printing.
Handling Multiple Shipments
The Problem
Amazon often splits your inbound plan into multiple shipments going to different fulfillment centers. In Seller Central, you have to manage each split separately — different carriers, different delivery windows, different labels. Tracking everything across multiple shipment IDs gets overwhelming.
When Amazon splits your items, SellerSheet automatically creates an STA-Options sheet with one row per shipment per placement option. Each row has its own:
- Shipment ID — Unique identifier for each split.
- Transportation Option ID — Choose independently per shipment (e.g., Amazon Partnered for one warehouse, your own carrier for another).
- Delivery Window Option ID — Select delivery slots per shipment (only needed for
USE_YOUR_OWN_CARRIER). - Reference ID / Status — Tracked per shipment after confirmation.
How it works:
- After 2. Generate Options, review the STA-Options sheet rows.
- Select the Placement Option ID on the main STA sheet (options show the fulfillment center and fee).
- For each shipment row in STA-Options, select your preferred Transportation Option and Delivery Window Option.
- Click 3. Confirm Shipment — all shipments for the selected placement are confirmed in one click.
- Each shipment gets its own FBA label PDF and its own row in Manage Shipments.
An Inbound PL (Packing List) sheet is also created showing the detailed item breakdown per shipment — which products go to which fulfillment center.
Important: Compare Placement Fees
Different placement options may have different fees. Check the fee column in the Placement Option ID dropdown before confirming — choose the option that balances cost and delivery speed for your needs.
Track & Manage Shipments
The Manage Shipments sheet serves as your central dashboard for all FBA shipments. After confirming, each shipment appears as a row with auto-filled data:
- Plan Folder — Clickable link back to the STA spreadsheet.
- FBA Label — Direct link to the carton label PDF.
- Status — Tracks the lifecycle:
WORKING→SHIPPED→CLOSED. - Carrier / Tracking — Fill in your carrier name and tracking number after shipping.
Click Update Plan Details in the sidebar to refresh the status from Amazon at any time.
Pro Tip: Cancel If Needed
Made a mistake? Click Cancel Plan in the sidebar before shipping to cancel the entire inbound plan. The row is marked as CANCELLED with a red background.
Quick Reference
Use this table to quickly find where each action happens:
| What You Need | Action | Sheet |
|---|---|---|
| Set up warehouse address | Fill once, reuse for all shipments | Shipment Setting |
| Prepare product catalog | Fill SKU / FNSKU / ASIN / box details | Product Info |
| Create a new shipment | Fill row → Create STA SS | Manage Shipments → STA |
| Walk through STA workflow | Sidebar buttons 1 → 2 → 3 → 4 | STA |
| Print carton labels | Get FBA Labels | STA or Manage Shipments |
| Print item barcodes | Create FNSKU Labels | STA |
| Track all shipments | View status, labels, tracking | Manage Shipments |
Maximizing Efficiency
- Reuse Product Info: Fill your product catalog once. Every new STA sheet auto-populates product data via VLOOKUP — no re-entering box dimensions or prep details.
- Auto-Import with FBA Inventory Reports: Use Store Reports to create FBA Inventory Reports and get SKU, FNSKU, ASIN, and title imported automatically.
- Batch Shipments: Create multiple rows in Manage Shipments and generate STA spreadsheets for each — work on them in parallel across different tabs.
- Multiple Warehouses: Set up multiple warehouse codes in Shipment Setting for different ship-from locations. Select the right one per shipment.
- After Shipment: For listing management (updating prices, titles, or adding ASINs), see the Create Listings guide.